 icon:
icon:Columns Definitions define the contents of your report columns, any calculations specific to your column, and the column headings within your report. The information in a Column Definition is combined with the Line Definition that you will specify and store for the Report Definition.
To create a simply Column Definition, click on the Columns bar to open the Columns Navigation Pane.
1. Select
the Columns Definition folder and then click on the New  icon:
icon:
a. Type a name and label for the new Column Definition in the New Columns pop-up box.
b. Click OK.
2. Your Column Definition will be created with the following columns by default:
a. Column A will be a Type field of “Row Definition Description”.
b. Column B will be a Type field of “Balance”.
3. In the Column Definition workspace, you can change the information in Column B to specify which period of data you wish to see:
a. In the Type field, choose the type of data from the drop-down menu. For example, select “Balance”, “Row Segment ID”, “Row Definition Description”, “Calculated”, or “Blank”, etc. For the purposes of this exercise, leave the value as “Balance”.
b. In the Book Code field, choose the book code from which data should be pulled by selecting the ellipsis button. For example, select “Actuals”, “Budget”, etc. For the purposes of this exercise, leave the value as “ACTUAL”.
c. In the Year field, use the ellipsis button to open the Year Options dialog, or, enter the four-digit year to specify which report year should be used. For the purposes of this exercise, leave the value as “YEAR”.
d. In the Period field, use the ellipsis button to open the Period Options dialog, or, enter the numeric period to specify which report period should be used. For the purposes of this exercise, leave the value as “Period”.
e. In the Value Type field, use the drop-down menu to select the Value Type. For the purposes of this exercise, leave the value as “Periodic” to default to the period specified on the report.
4. To insert additional columns, select a column in the Column Definition grid and right-click.
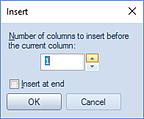
a. Select the Insert column option to add an additional column. The Insert option adds a new column to the Column Definition workspace before the point selected or at the end, depending on which you specify in the dialog below:

Additionally, using the TAB or RIGHT ARROWS keys when focused on the last column will add a new, blank column at the end of the Column Definition workspace.
b. When prompted, select the Yes button to confirm your delete action.
5. Click Save to save the new Column Definition. (Any pending changes will be indicated with an asterisk until you save the Report Definition.)
You can always drag-and-drop your columns from one location to another if necessary.
You can delete a column from your Column Definition by:
1. Highlighting the entire column and right-clicking to select the Delete column option.
2. (Or, you can drag the column off of the Column Definition workspace.)
3. When prompted, select the Yes button to confirm your delete action.
Note: You can also select multiple columns for deletion using the Shift key and using the mouse to click on each column you wish to delete. Then, use the right mouse-click to select the Delete option from the pop-up menu.
For more information on the specific fields defined in each Column definition refer to the Column Fields topic.