You can add new roles in Prospero based on your organization’s permission requirements or naming conventions.
To add a Role:
1. Select the Security bar on the Prospero Navigation Pane.
2. Open the User Definition workspace using the User Definition icon.
3. Select the Add Role option from the Security Tools Security context ribbon or by right-clicking and selecting the Add Role option from the pop-up menu.

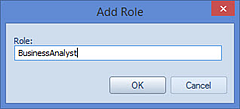
4. The Add Role window will appear:

5. Enter the name of the new role. Click OK button for the new role to appear in the User Definition workspace. (The new role will then be stored to the database with no members and no granted permissions.)
6. The User Definition workspace will open.
7. Assign the permissions you want by checking the checkbox next to the permission.
Note: The type of license required by the permissions defined on the role will be noted on the workspace.
8. Close the User Definition workspace by clicking on the X next the name on the tab.
9. When prompted, Save your additions.
Once the role’s permission elections have been made and the changes saved, you may drag-and-drop existing or add new users to it. Any Users added or moved to your User-Defined Role, must have a valid associated Prospero license for the permissions defined.
For more information, see the topic Prospero Security Permissions and Adding Users.