The Lines Tools Definition context ribbon contains many of the specific features for creating, designing, and managing lines. This ribbon will appear whenever you define a new or modify an existing Line Definition.
Many of the functions available on the ribbon are also available from the pop-up menu available by using the right-click mouse button in the Line Definition workspace.

Features on this ribbon are grouped logically in sections including:
•Edit – This section contains functions to manage your Line Definition, such as adding or deleting rows in your line definition. The Build option allows you to insert one or more items from the segment in to the set.
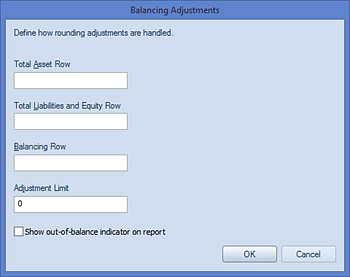
The Balancing Adjustment option allows you to directly manage situations where a Balance Sheet report is out of balance, either because the amount out of balance is too small to reconcile or will be reconciled later. Using the Balance Adjustment feature, you can calculate the amount and place it in a user-designated row of the line definition.

In the Balancing Adjustment screen you will define the Total Asset Row, the Total Liabilities and Equity Row, the Balancing Row and an Adjustment Limit (as a total dollar amount not in excess of $200). All rows are referenced by their Line Definition Code field value – not by the segment account (i.e. Natural account).
When a Balance Sheet report is run, if the adjustment limit is exceeded, the user will receive a warning message and the row item on the report will appear with a small red block notation. This notation will not appear on printed reports and the notation can be suppressed on the Report Viewer if the “Show out-of-balance indicator on report” is unchecked. In addition, if there are multiple columns indicated on the report, the notation will indicate each issue occurrence, only when the checkbox is checked.
You can toggle the showing of indicators on the report using the selection on the Report View context ribbon.

In Chart View, the user will only receive the warning message that the adjustment limit is exceeded.
•Font – This section allows you to specify the text properties of your line’s cells, such as fonts, colors, highlighting, bold and italics.
Reset the font to the system default using the  option next to the Font Size drop-down
menu.
•Alignment – This section allows you to specify the alignment and number of spaces of indentation for the text in your lines. For more information, see Indent.
Reset the alignment and indentation to the default using
the  option on the right side of the
Alignment section. (Data in numeric columns are right-justified by default; data
in text columns are left-justified.)
•Security – The Security section contains the Set Password function to add or remove passwords from your Line Definitions.
•Usage – This section contains options to show you which reports use the Line Definition and open the Report Definition directly from there. The Where Used option opens a window which displays all the places the given set is used.
The Report Definition option has several purposes:
o If the current set was opened from a report (report output, chart or definition screen), the Report Definition option will open the originating Report Definition.
o If the current set was opened manually (from the Navigation bar, for example), it brings up the Where Used option window – if multiple uses of the item in a Report Definition are found.
o If the current set was opened manually (from the Navigation bar, for example), it returns the associated Report Definition – if only one instance exists.
The Validate option allows you to check if data in the line set has missing or duplicate account information. The Validate option will return this information when your Line Definition is opened in the workspace.
•View – this section provides options on how you may view your Line Definition workspace. The selections in the View section will control your ability to see elements such as the Properties Pane, the Preview Pane, Line Expansion fields, Line Formatting fields, and Option fields.